Serverless Zero-Downtime on AWS: Blue-Green and Canary with Terraform, No CodeDeploy Required
Blue-green deployment, rolling deployment with canary, sounds great ٩(◕‿◕)۶ but what does it mean and how can it be implemented in the real world? It promises to keep your systems live for your clients while updates happen behind the scenes. Let's see what this means and how it works using our good friend serverless technology, to be specific AWS Lambda with the best IaC in my unhumble opinion, Terraform. Enjoy the show.
Why does this matter, beyond everyone just saying it does
Every time someone deploys, there is a window where things can go belly-up. That nervous period where you wait for the deployment to complete. That is what zero-downtime deployment is really about: closing that window before anyone notices it was open.
As cool as it would be for your code to just work on prod (つ▀¯▀ )つ, there are eventually going to be issues. To get new code running once it has been pushed to the server, you need to stop what was running before, build the new version, and run it. That gap, however small, is your downtime. If everything goes perfectly, your new build comes up in seconds with zero issues. You have the Midas touch. Congratulations.
For almost everyone, there are build failures, runtime errors, cold start surprises, and the occasional configuration that worked fine in staging and immediately caught fire in prod. The simpler your setup (a single server, SSH-based deploys, no retry mechanism), the worse that window gets.
This problem is well explored for servers and long-running services. For serverless? Not so much. With how popular serverless has become, this is simply unacceptable, so let's go through how to do it.
Why Not CodeDeploy?
CodeDeploy is fine, and in some real-world scenarios it is exactly what you want, particularly if you need automated rollbacks triggered by CloudWatch alarms or pre- and post-deployment validation hooks. It is a great tool, just not for this scenario.
That said, for this walkthrough we are keeping things simple and minimizing the number of AWS resources we spin up. More importantly, the moment your serverless application grows beyond a handful of functions, CodeDeploy starts to become its own problem. Every function you want it to manage needs its own CodeDeploy application, deployment group, and IAM configuration. Ten functions means ten of those setups. Twenty functions means twenty. It compounds fast and for most workloads, you simply do not need it.
Lambda already has traffic shifting built-in through weighted aliases, which we will use with Terraform directly. No extra steps, and it scales across as many functions as you have without any additional overhead.
Prerequisites
I will assume you have a basic understanding of AWS Lambda, API Gateway, and Terraform. If you are new to any of these, I recommend checking out the official documentation and some introductory tutorials before diving into this article.
For our walkthrough, you will need:
- AWS Account with appropriate permissions to create and manage Lambda functions, API Gateway, and related resources.
- Terraform Installed
Review the Architecture
We are building the Hello World of projects, a note-taking app to demonstrate the deployment pattern. To keep it as close to a real application as possible, we will be using five Lambda functions to represent each CRUD operation, fronted by an API Gateway and a DynamoDB table for the notes. Each function is independently versioned and deployed.
A full-scale setup and modification would take too long so the walkthrough will focus on CreateNote and GetNote. The other three functions exist but we will not be touching their deployment in this article. Our step-by-step will be:
- Deploy v1 of all four functions
- Ship v2 of CreateNote that automatically stamps a
created_attimestamp on every new note - Blue-green switch CreateNote to v2 while GetNote stays on v1
- Verify GetNote still returns notes correctly, backward compatibility intact
- Ship v2 of GetNote that surfaces the
created_atfield in the response - Canary shift GetNote to v2, watch it hold, promote
Each Lambda response will include an X-Function-Version header so you can see exactly which version handled your request at every step.
To get started clone the repo
git clone https://github.com/Toluhunter/Terraform-Lambda-Blue-Green-Canary-No-Codedeploy.gitThe complete final codebase including all changes from this walkthrough is available on the final branch if you want to reference it at any point.
Before running any other commands let's go over the repo structure, in the repo we have several files:
├── apigateway.tf
├── dynamodb.tf
├── lambdas.tf
├── modules
│   └── lambda_function
│       ├── main.tf
│       ├── outputs.tf
│       └── variables.tf
├── outputs.tf
├── provider.tf
├── src
│   ├── create_note
│   │   └── index.py
│   ├── delete_note
│   │   └── index.py
│   ├── get_note
│   │   └── index.py
│   ├── list_notes
│   │   └── index.py
│   └── update_note
│       └── index.py
└── variables.tfHere are the key files and directories to note and a quick summary of their purpose:
provider.tf- AWS provider configurationvariables.tf- Input variables for the Terraform configurationdynamodb.tf- DynamoDB table definitionlambdas.tf- All Lambda function definitions and versionsapigateway.tf- API Gateway setup and integration with Lambdaoutputs.tf- Outputs for the deployed resourcessrc- The directory containing the source code for the Lambda functionsmodules/lambda_function- A reusable Terraform module that provisions a Lambda function, its IAM role, and alivealias
The lambda_function module is doing the real work behind the scenes. It deploys every function with publish = true, which automatically creates a new numbered version every time the code changes. It also creates a live alias that points to a specific version which from our code is version 1. API Gateway calls the alias, not the function directly. Swapping traffic between versions is just telling the alias where to point. That is the whole trick.
Feel free to explore the code a bit more, however this is not a Terraform tutorial so I won't be getting into the weeds of each file.
Step 1: Deploy v1 of all five functions
Ensure you have all your AWS credentials or profile set up, then run the below commands:
AWS Lambda version numbers only ever increase, they never reset even after a function is deleted and recreated with the same name in the same region. All five Lambda functions in this repo have
function_version = "1"pinned, meaning the alias will point to version 1. If you have previously deployed any of these function names (notes-create,notes-get,notes-list,notes-update,notes-delete) in this region, that version will not exist. Either run this walkthrough in a fresh region or update thefunction_versionvalue inlambdas.tfto match whatever version your account will assign next.
terraform init
terraform apply -var="aws_region=us-east-1" -auto-approveCongratulations, you have just deployed your first version of the application. If everything worked as expected you will be able to get the URL of your API Gateway for invocation with the below command.
API_GATEWAY_URL=$(terraform output -raw api_url)
echo $API_GATEWAY_URLTo verify the version of the function, first try creating your first note.
curl -i $API_GATEWAY_URL/notes \
-H 'Content-Type: application/json' \
-d '{"title": "To Terraform or not to Terraform", "content": "IAC is a beautiful craft able to summon fleets of compute at your very command, with this power comes endless potential with the allure of creation"}'Response should look something like:
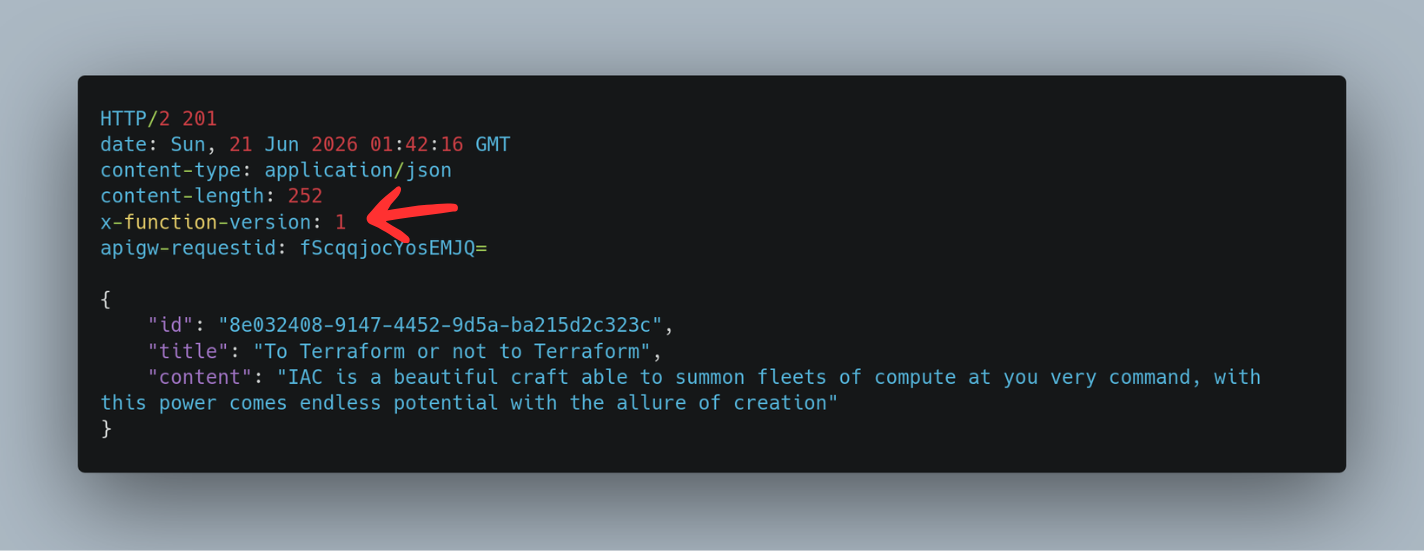
Take note of the header X-Function-Version: 1, this is how we will track which version of the function is currently live. You can proceed to verify the note was created successfully by running the below command to list all notes:
curl -i $API_GATEWAY_URL/notesHere is the command to get your note.
curl -i $API_GATEWAY_URL/notes/<note_id>Step 2: Modify the Terraform to support blue-green and canary deployments
With v1 up and verified, let's set the stage for what is coming. Lambda aliases can point to a single version or split traffic between two. The module we deployed does not support traffic splitting yet, so let's make the necessary changes.
To do this we are going to modify our lambda module to add routing config to our lambda alias.
In the file modules/lambda_function/main.tf we will change the following code block to include a dynamic block for routing_config. This will allow us to specify additional version weights for canary deployments. The idea is to keep the alias pointing to the current version while shifting a small percentage of traffic to the new version. This is how we can achieve blue-green and canary deployments without CodeDeploy.
resource "aws_lambda_alias" "live" {
  name             = var.alias_name
  function_name    = aws_lambda_function.this.arn
  function_version = coalesce(var.function_version, aws_lambda_function.this.version)
}Our new code block will look like this:
resource "aws_lambda_alias" "live" {
  name             = var.alias_name
  function_name    = aws_lambda_function.this.arn
  function_version = coalesce(var.function_version, aws_lambda_function.this.version)
  dynamic "routing_config" {
    for_each = var.routing_config != null ? [var.routing_config] : []
    content {
      additional_version_weights = routing_config.value
    }
  }
}The coalesce on function_version means: if we provided a version use that, else if it is null, then use the latest version. That is what lets the alias stay on v1 while v2 is being rolled out.
additional_version_weights is a map where the key is the version number and the value is the fraction of traffic to send to it, between 0.0 and 1.0. The alias primary version gets the remainder. So { "2" = 0.1 } means 10% goes to version 2, 90% stays on whatever function_version points to.
Next we need to add the routing_config variable to our variables.tf file in the same directory as our lambda module. This variable will be used to specify the additional version weights for canary deployments.
variable "routing_config" {
  description = "Optional routing configuration for canary deployments"
  type        = map(number)
  default     = null
}While we are at it, let's also add the latest version numbers for CreateNote and GetNote to our outputs. We are adding the versions to the output so we don't need to log in to the console to identify the latest version. This will be very helpful when we want to switch our versions.
output "create_note_version" {
  description = "Latest published version of the CreateNote function"
  value       = module.create_note.version
}

output "get_note_version" {
  description = "Latest published version of the GetNote function"
  value       = module.get_note.version
}There is no need to run apply for now; these changes have no effect on the infrastructure yet.
Got something in mind?
I work with teams and founders building systems that need to be built right. Scalable, reliable, maintainable. If that sounds like your situation, let's talk.
Let's talkStep 3: Ship v2 of CreateNote and GetNote
Now that we have the infrastructure ready to support blue-green and canary deployments, let's ship v2 of both CreateNote and GetNote. CreateNote gets a created_at timestamp on every new note and GetNote gets updated to always surface that field in the response.
CreateNote v2
In src/create_note/index.py the only change is importing datetime and stamping the field before the item goes into DynamoDB.
import json
import os
import uuid
from datetime import datetime, timezone

import boto3

dynamodb = boto3.resource("dynamodb")
table = dynamodb.Table(os.environ["TABLE_NAME"])


def handler(event, context):
    body = json.loads(event.get("body") or "{}")

    item = {
        "id": str(uuid.uuid4()),
        "title": body.get("title", ""),
        "content": body.get("content", ""),
        "created_at": datetime.now(timezone.utc).isoformat(),
    }

    table.put_item(Item=item)

    return {
        "statusCode": 201,
        "headers": {
            "Content-Type": "application/json",
            "X-Function-Version": context.function_version,
        },
        "body": json.dumps(item),
}GetNote v2
GetNote already returns the full item from DynamoDB, so created_at will come through automatically on notes created with v2 of CreateNote. The change here is adding a setdefault call to guarantee the field is always present in the response, even for notes that were created before v2 existed.
import json
import os

import boto3

dynamodb = boto3.resource("dynamodb")
table = dynamodb.Table(os.environ["TABLE_NAME"])


def handler(event, context):
    note_id = event["pathParameters"]["id"]

    response = table.get_item(Key={"id": note_id})
    item = response.get("Item")

    if not item:
        return {
            "statusCode": 404,
            "headers": {
                "Content-Type": "application/json",
                "X-Function-Version": context.function_version,
            },
            "body": json.dumps({"message": "Note not found"}),
        }

    item.setdefault("created_at", None)

    return {
        "statusCode": 200,
        "headers": {
            "Content-Type": "application/json",
            "X-Function-Version": context.function_version,
        },
        "body": json.dumps(item),
}Both functions are now at v2 in the codebase. When Terraform sees the source code has changed it will package and upload a new version of each function on the next apply. The aliases will still point to v1 until we specify otherwise, so for now let's run the apply to get our new versions ready in AWS.
terraform init
terraform apply -var="aws_region=us-east-1" -auto-approveOnce this is complete, you can check the outputs to see the new version numbers for CreateNote and GetNote.
terraform output create_note_version
terraform output get_note_versionStep 4: Blue-Green Switch CreateNote to v2
Now we are going to switch CreateNote to v2 and leave GetNote on v1. This is the blue-green deployment. We will then verify that GetNote still works as expected before we can move on to canary shifting GetNote to v2.
Change the function version in the lambdas.tf file for CreateNote to the new version number that was output in the previous step. For example, if the new version is 2, we will change it to:
function_version = "2"Apply the change:
terraform apply -var="aws_region=us-east-1" -auto-approveNow all traffic for CreateNote is hitting v2. Let's confirm this by creating a new note and checking the response header for the function version.
curl -i $API_GATEWAY_URL/notes \
-H 'Content-Type: application/json' \
-d '{"title": "The struggle towards the deployment V2", "content": "The function laughed as it failed, for it knew that to have failed was to have been deployed"}'
We can see two things that show our blue-green deployment worked. The X-Function-Version header changed to 2 and the created_at timestamp is now present. At this point, if you use the GetNote endpoint, you would see the timestamp but the version is still 1. If you try getting an old note you will notice the created_at field is absent. This is fixed in our v2. Let's get into canary deployment.
Step 5: Canary Deployment for GetNote
With CreateNote fully on v2, it is time to shift GetNote. Unlike the hard switch we did for CreateNote, this time we are using a canary deployment to gradually move traffic to v2.
In lambdas.tf, add routing_config to the module "get_note" block:
routing_config = { "2" = 0.1 }This tells Lambda to send 10% of traffic to version 2 while the remaining 90% stays on version 1. Apply the change:
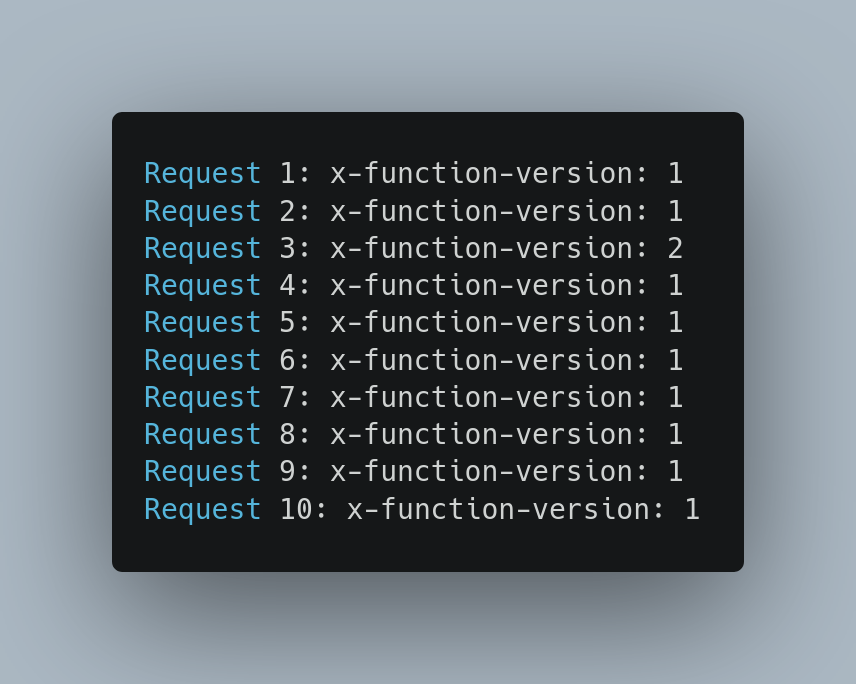
terraform apply -var="aws_region=us-east-1" -auto-approveRun the following script to fire 10 requests and observe the traffic split:
NOTE_ID=<your_note_id>

for i in $(seq 1 10); do
  echo -n "Request $i: "
  curl -s -i $API_GATEWAY_URL/notes/$NOTE_ID | grep -i "x-function-version"
doneYou should see roughly 1 out of 10 requests return X-Function-Version: 2, with the rest on version 1. To promote GetNote fully, update the function_version to "2" and remove routing_config from the module block. Apply one final time and all traffic moves to v2.
Wrapping Up
We went from a basic Lambda setup to a production-grade deployment pipeline, all without CodeDeploy. Blue-green gave us the confidence to flip traffic instantly and roll back just as fast. Canary gave us the ability to test on real traffic with a controlled blast radius. Lambda aliases did the heavy lifting and Terraform kept it all reproducible.
This is a solid foundation but it is just the start. A few natural next steps if you are taking this further:
Remote state management. A local terraform.tfstate file is fine for a personal walkthrough but in a team environment it is a liability. Moving your state to S3 with a DynamoDB lock table gives you shared, consistent state across the whole team with no risk of conflicts.
Dev alias. Right now the live alias is the only gate between your code and production traffic. Adding a dev alias pointing to the latest version gives your internal team a dedicated endpoint to test against before anything touches the public. The same module supports it with a second alias resource.
Database sort key. With created_at now stamped on every note, the natural next step is adding a Global Secondary Index with created_at as the sort key on your DynamoDB table. That gets you chronological queries without a full table scan every time.
There is so much more that can be done beyond this. Automated rollbacks triggered by CloudWatch alarms, approval gates between canary and full promotion, per-function deployment pipelines. The foundation is there, where you take it is up to you.
Got something in mind?
I work with teams and founders building systems that need to be built right. Scalable, reliable, maintainable. If that sounds like your situation, let's talk.
Let's talk